Introduction
The relative ease of use of modern image editing software allows anyone to change images and thus
to misinform people. How can one tell whether a video or an image has been tampered? The most common
approach is to find logic errors and craft mishaps that indicate the use of an image editing
software. Here we come up against the limits and not all attempts for explanation seem to be
completely unambiguous and plausible.
Another method that appears promising is the analysis of imaging data. Completely independent of
logical errors and craft mishaps this method is based on the analysis of digital information that makes
up an image file. Here one can find traces, which provides information of whether an image/video
has been "treated" by an image editing program or not. Traces that you can not see and of which
many are not aware that they exist.
But what traces are left at all? Where should you look for and how can you discover these traces?
We focused on the most common image formats used on the Internet and first of all we decided to
break down and to understand the JPG image file format and its data structure.
Analysis of the Data Structure of a JPG Image
Information material of the JPG image format can be found quickly by means of search engines. However, the
technical details are quite demanding and it turns out that this issue is much more comprehensive than
one might first assume. The general description of the format can at first sight not reveal
how to find useful methods for image forensics approaches. There is a comprehensible range of information
on this particular topic and they often treat only certain aspects. At this point, we realized that
the understanding of the data structure of an image format had to be built up through own experiences.
The procedure of extracting the structural elements of a format through examination of structures,
conditions and behaviors is known in the IT as the so-called "reverse engineering"
 .
Accordingly, the same software tools were used for this research, which have proved to be useful in reverse engineering. .
Accordingly, the same software tools were used for this research, which have proved to be useful in reverse engineering.
JPG images represent files that consist of a sequence of bytes. However, the pure binary sequence
consisting of zeros and ones is barely comprehensible for humans to be read.
In order to display this sequence of bytes in a structured and a more readable way, so called hexadecimal
viewers or hex editors
.
are used.
But the usual view presented by standard hex editor is not clear enough to produce useful results and to enable
us to do further investigations of the image formats. For the efficient investigation
a customized hex editor is needed which is specifically designed for image analysis in the JPG format.
Based on the documentation available in the Internet, there was the possibility to use a hex
editor we have developed in the project group which shows the structure of a JPG file and
by special program enhancements enables us to break down and visualize the structure of the image file
according to the JPG specifications. In this context, it is often referred to as JFIF ("JPEG File Interchange Format"),
but this only sets the transportation modalities for the exchange of JPEG bitstream.
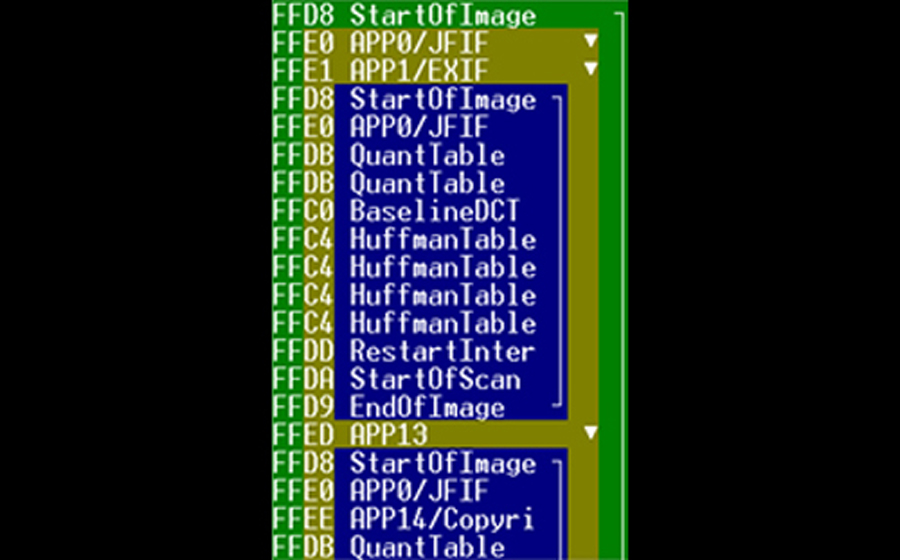
The following screenshot shows how a JPG shot looks like using our modified hex editor. The image
was taken directly from a digital camera.

Click to enlarge this image
At first sight this may look somewhat confusing, but the principle is quite easily conveyed. JPG images
always start with the byte sequence "FFD8" (see line with byte value 1 on the left). This is a marker that
defines the beginning of a JPG image ("Start of Image"). Accordingly, at the end of the image file there
is a marker that defines the end of the image by using byte code "FFD9". These markers, along with other
essential markers must exist, otherwise the file is not recognized as a JPG image and can not be displayed
by image viewing software. It can be seen here, that our sample image file contains two markers which act as the
beginning and two markers that are used for the corresponding end ("End of Image").
Obviously there are two images in the JPG file, whereby one image is embedded within another image.
To make it short, this is a preview image that was created by the digital camera. Usually digital
cameras (as well as smartphone cameras) create images in JPG format, which consists of a large main image
(here symbolized by the square bracket in the green box) and a smaller, low-resolution preview image
(symbolized by the square bracket in the blue field). This preview image is located within a meta tag area,
which in turn is part of the main image. Meta tags represent data fields that can contain information about
basic features of the JPG image. Meta tags are not a mandatory part of a JPG image. By default, however,
this approach has prevailed in camera software.
Changes in the Data Structure through Image Processing
What happens when a JPG image that comes directly from the camera, was edited by an image editing program?

Click to enlarge this image
Compared to a regular camera image, the analysis shows that the data structure has changed after image processing.
In this new sample image three images are now visible within the present JPG file. The large main image (green),
the preview image (blue) the digital camera has created and now another second preview image (blue)
that was created by the image processing program. It is possible to read out more sensible information. The compact
view shows the structure of a JPG file only on the basis of three markers (Start of Image / Start of Scan / End of Image).
But in between there are further markers. The following screenshot shows the JPG structure in a detailed
view with all existing markers.

Click to enlarge this image
In the detail view it can be seen that a JPG image consists of more than just a start and an end marker.
Among other things, there are the quantization table, the discrete cosine transform and the Huffman tables.
These are basic components, which also belong to a JPG image and have been created in the course of the
compression algorithm. These ones will be needed again for decoding the image data.
Digital images represent arrays of pixels, tiny dots with specific color and brightness values. A JPEG image
is not just a long listing of these values, but is coded so that the resulting file has about one-tenth of the
size of an uncompressed image file. The JPEG standard processes include various mathematical
methods. Among them are procedures that have no effect on the image quality and are referred to as lossless, as
the so-called Huffman coding
,
and others, which can degrade the image quality and are considered lossy as the so-called downsampling
and color space transformation
Although lossy techniques can reduce the clarity of the original image, it was decided to use this method because
the lost details are relatively inconspicuous to the human eye and depending on the used quality level they are
aesthetically tolerable.
Typical Characteristics of Original Camera Images
Aside from these images markers, there are other ones that begin with the abbreviation "APP". For the JFIF format 16
so-called APPlication segment markers have been defined. All modern digital cameras should follow this standard.
Detailed view of the present markers within the JPG image file
Embedded preview images (blue area) within the main picture (green area)
First striking element is the APP0/JFIF-Marker. Among other things APP0 contains the JFIF version number
(always version 1.02) the screen and printing resolution in X and Y direction. The APP0/JFIF-Marker may be missing.
but if it is present, it should be mandatory at the byte position 3 (see previous figure). Furthermore, it was determined
that imaging parameters are stored within the APP1/EXIF-Markers according to the Exif format policy
.
The imaging parameters include information such as date and time, orientation
(rotatation of the image by 90, 180 or 270°), focal length, shutter speed, aperture, exposure mode, the ISO (light sensitivity),
GPS coordinates (see photo localization Geo-Imaging) and a preview image that can be seen as a blue area in the picture.
Hereinafter, an excerpt of those data is shown, which are included in the meta tag APP1/EXIF. Here you can read,
which camera was used to take the image and exactly when this image was created. In this case, it was a smartphone
camera (Samsung GT-I8160).

Click to enlarge this image
The image editing program Photoshop stores its internal image processing parameters (plus an own preview image)
by default in APP13. This appearance indicates that this images was "treated" in some way by Photoshop.

Click to enlarge this image
The view into the meta tags of a JPG file can therefore reveal whether the image contains features that are typical
of an image that comes directly from a camera. Images that consist of only one main image, are very atypical.
This also applies to images that contain more than one preview image. These are suspicious evidences to suggest that
the image was treated with an image editing program. An image file that includes an entry of an image editing program
(see previous screenshot - contents of APP13), can not be considered and evaluated as an original image according to strict
guidelines. Whether something in the image has actually been changed or not is of no question. Original "untreated" camera images do not
contain APP segments like these.
Examination of Different Image Templates for Traces of an Image Processing
We now know that JPEG images can contain further images, so it was interesting in the
next step to check whether the embedded images always show low resolution preview images of the main image.
These preview images have basically the same data structure as the main image
and it is actually possible to extract these parts and to treat them like regular JPG images.
Here you can see the main and preview image of a regular camera image:

Click to enlarge this image
Another source for interesting image examples, which is often said to be forged, are UFO photographs.
When searching for examples, it turned out that it is hardly possible to find original camera shots.
Although there exist a number of UFO photo archives on the Internet, many images listed there wear marks,
logos, have been scaled to uniform sizes or were partially enlarged. Images, that have been altered with
image processing applications. One gets the impression that these sites are just interested to hoard up as many
images as possible. Of the just over a hundred images that were collected for this study on the Internet, about
80 percent were identified as "treated". Although it has been noted that some of the images
are original images, it can be proved that this is not true. That does not mean that they were
forcibly faked, but in accordance with the criterion of authenticity such altered images
can not bear the designation "original".
Nevertheless we examined several sample shots that were not originals by definition, just to see
whether the main and preview images always correlate with each other. There were some surprises.

Click to enlarge this image
A fine example of an image file that is the result of an interaction with an image editing program,
can be seen in the previous image. The preview image shows a cemetery, while the main picture actually just shows
an alleged UFO. This can happen during an image processing session, when the UFO shot was copied and pasted
into another edit window, in which an image of the cemetery was initially present.
Perhaps the image creator had left open a second edit window which, in his opinion, had the right size
for his UFO picture.
This needs not necessarily to be an evidence of a malicious manipulation, but it can no longer be considered as an
original.
The next example shows another variant, which occurs sporadically. The preview image shows a
larger image section than the main picture. Apparently, the image creator decided to set the focus
on the UFO and cut off uninteresting parts of the image on the right side. So here you can see
that the original recording was a larger picture than that what the viewer gets to see. Certainly an
insightful information.

Click to enlarge this image
Why such discrepancies arise on only a few images, can not always be determined exactly. It is a peculiarity
that can appear in certain image processing programs (possibly different versioning) and to very specific
processing steps. However, they are an indicator that the image file has been processed in some way. The image
examples, we have examined so far, may also have entries in the form of marker segments, such as APP13, containing
the name of the image prossessing program, in our example Photoshop.
Example of a Fake UFO Image
Apart from a few oddities, where the preview images are completely different to the main image,
there are also images from which one can detect deliberately induced manipulations. The
following example shows an enlarged section of a UFO shot that was made aboard a
passenger plane. The entire image is relatively large using a resolution of 3888 x 2592 pixels.
The embedded preview image has a resolution of only 160 x 120 pixels. One problem is that
on low-resolution images, small details will be lost through the rescaling and the
lossy compression process. As it will turn out, even in this case the alleged UFO is still above the
critical size limit.

Click to enlarge this image
The small image section at the bottom right shows the enlarged area of the preview image, where the
UFO should be located. However, there are no irregularities visible which indicate the remaining
outline of a UFO. It could be assumed that due to the low resolution of the preview image fine details
got lost. As a check-test the main image has been scaled down to the same size of the preview image
and saved with the same minimum level of image quality. The juxtaposition of the newly generated preview
image shows that all image features match, even the outline of the UFO is still visible.
The difference is very small yet, but it is large enough to be significant. One can still see the
reflection and shadow side of the alleged flying object. It should also be present
in the preview image. A small but crucial difference.
Conclusion
The data structure analysis of a JPG image can help to track irregularities. Are all standard
meta tags absent including the Exif preview image then these templates can not be considered as original
images. Even if just a cleaner routine was applied to remove all meta data of the image - an original image
must be intact in all matters.
Deviating values between the recording parameters and the main image would be a
possible indication of tampering. It should be noted here, however, that meta data and all other data are
editable. A hex editor or appropriate designed software allows the change of any meta entries. Counterfeiters
have to keep an eye on numerous recording and image parameters to avoid inconsistencies.
Treacherous are the visible differences between main and preview image. It should be noted that the preview image
is a smaller version of the main image with a lower resolution, which, moreover, was possibly encoded with the
lowest quality level. Many small structures of the main image get lost in the preview image. When a very small
area of just a few pixels was edited in the main image, then the resulting preview image can not afford enlightment help. Apart
from the limitation of being unable to detect small-scale changes in the preview image, there must be the situation
in which the change of the main image has not been passed on to the preview image. This happens relatively seldom,
and depends on the used image processing software and the way in which the change has been managed.
The examination of the preview image should therefore represent only one of many other testing methods. Occasionally
very interesting results can be delivered, but this method also depends on many confounding factors.
For research groups which examine images and videos of UFO recordings, specific requirements arise from the results
derived here that have to be fulfilled. Otherwise further investigation loses its usefulness:
First of all, the image templates must be originals. That means, the images have to come directly from the camera.
Only the sole copying of the image files is legitimate. At no time image processing programs may come into play. It
does not matter if an attempt was made in good faith and without evil ulterior motives, only to improve the image
quality. For example, by using contrast or brightness enhancements or by cutting off unimportant parts of the image
or by setting arrows or colored circles to mark the position of the UFOs. There are image editors or special software
applications that offer the option to delete the meta data of an image. Again, this is not allowed, because preview
images may be lost using this option. This has no effect on the display of the main image, but the image
integrity has gone out with this approach.
Secondly, for a usable analysis UFOs must be photographed in appropriate size. Of course, in such an event no one
can expect that optimal conditions for an extensive photo shoot and professional equipment are present, but
creators of such images have to be aware that UFO depictions with dimensions of only a few pixels have no basis
to be objectively evaluated as UFO by neutral observers. These so-called pixel UFOs represent basically anything.
A plane from a certain distance can have similar visual characteristics in the corresponding view. The same is true
with birds or even insects, depending on the distance and viewing angle. No matter what circumstances and conditions
go hand in hand with the image creation and no matter for how credible the image creator is advertised. For image
analysis the sole recording counts. Anyone who claims to possess an unambiguous UFO image, must also be able to meet
these requirements before a proper analysis can even start.
Finally, it should be mentioned that numerous image examples that can be found on the Internet originate from
times when there were no digital cameras. Accordingly, the existing photographs were scanned and
thus do not have the typical meta tags as they can be found in original JPG images from digital cameras.
The presented analysis methods can not be applied to these image examples. This also relates to a number of
other methods. Due to the media break many of the original recording parameters can not be reconstructed.
References
|